I made this cake for my friend Grace’s birthday, and it was one of the funnest cakes I’d ever made. This cake is 100% vegan from the cake to the decorations 🙂
 The flowers and colors were so fun to do, the perfect evening activity when you’ve spent your daytime looking at a computer screen all day (I see you, clinical research). You have to plan ahead a little bit to give the gum paste flowers time to dry, but if you really wanted to you can theoretically make it all in one day if you do the flowers in the morning so they have a few hours to dry completely.
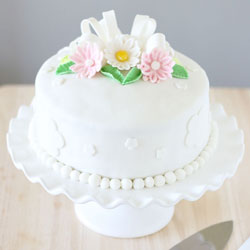
 So what does fondant taste like? It tastes like fluffy marshmallows. Or a sweet cloud. I bought a package of it while taking the Wilton cake decorating class at my local Michael’s and it was surprisingly delicious. And the best part was, fondant was pliable like silly putty. Gum paste was the harder version of fondant that is very pliable at first but dries quickly once you stop kneading and shaping it. You could make beautiful shapes with gum paste – all the daisies and leaves on this cake are made of gum paste. Gum paste is still edible, but it’s super crunchy and not very tasty.
 The daises, I made the night before I assembled the cake out of gum paste so they could dry fully before I put them on the cake. Gum paste needs a few hours to dry, but is great for making flowers. For the blow, I used a mixture of 1/2 gum paste and 1/2 fondant so it wouldn’t dry as fast. This way I had time to assemble the bow. The bow you’ll need to split into 2-3 days to make. The first day you make all the loops and let those dry overnight. The second day you insert the loops into a ball of 1/2 gum paste and 1/2 fondant mixed together and let the entire contraption dry for another few hours or overnight. At this point I glued the daisy to the bow using some water mixed with gum paste.
 Here are the details on how I decorated this cake:
- 2 days in advance, make loops for fondant bow (see video here). To do so you’ll need a rolling pin, fondant rolling mat, ruler, and a spatula to cut the ribbons from rolled fondant. Use mixture of 1/2 gum paste and 1/2 fondant, knead together, roll out into a thin disc, and use ruler to measure and cut into 5 inch strips that I then folded into a loop and glued together with the edible glue (edible glue = pinky nail size piece of gum paste dropped in water). Then cut the tip of the loop so it’s pointed so you can insert it into the bow base later. while you are cutting the strips, keep the strips away from air or they will dry out (gum paste dries very fast). To do so, cut the sides of a zip-loc bag open so you have a zip-loc flap. Put the strips between the two sides of the flap. You can also purchase a gum paste storage board if you want something more durable.
- 2 days in advance, make daises (see video tutorial here). Color daises how you choose by mixing a few drops of food coloring with a toothpick into a ball of gum paste and kneading till the color is evenly distributed. I made yellow,green, and pink. To tint the flowers, I used lemon yellow, kelly green, and pink from my gel color set. Use a flower shape cutter to cut daisies out of gum paste. Here are some good kits (A, B) with daisy cutters. Use a fondant shaper stick (the green tapered tool in kit B) to make the daisy petals pop up by dragging the shaper along the petal toward the center. Do the dragging on a piece of foam so it doesn’t stick and tapers up. Dust the foam with corn starch or powdered sugar before you put the daisy on it, to avoid sticking. Use gum paste glue to add daisy center. For the yellow center, you can roll it in gum paste glue and then yellow sugar for a glittery look. Roll out green fondant and cut with a leaf cutter. Use a fondant shaper tool to press into the center, making the leaf creased. Then draw the veins of the leaf with the same tool. Let everything dry overnight. See video on leaf-making here.
- One day in advance, make bow base by kneading a ping-pong ball size of 1/2 gum paste and 1/2 fondant. Insert dried loops into the base. Bake the cake, torte it, and do a crumb coat. Cover it with fondant (see video).
- Use flower cutters to cut large and small flowers, and adhere to fondant cake with edible glue. Attach the bow with edible glue, as well as the remainder of the daises and leaves.
- Roll small balls with fondant and adhere to the side of the cake using edible glue.
- (Optional) Write words on the cake by mixing some lemon extract with food coloring (I used moss green) and mixing with your paintbrush. Then paint the words on with a fine paint brush. You can do the same with pink pearl dust to accent the pink daisy petals.
 The cake underneath the fondant is a vanilla cake, that also happens to be vegan! Every part of this cake is edible, but I don’t suggest you eat the flowers and leaves because it’ll be super crunchy.

At first it might seem like a fondant cake is a ton of work, but if you split it into multiple days and do a little each day when you are taking a break from something else, it’s very manageable. And once you practice covering a cake in fondant, any cake that you botched the buttercream frosting on or don’t want to spend a long time frosting perfectly, can immediately become a fondant cake 😉
The actual process of covering a cake in fondant is a lot faster than icing it with buttercream. Whenever I work with buttercream I have this urge to make it absolutely perfect, so I frost it over and over and have literally frosted a cake for over 2 hours (seriously, all I did was turn the turn table for two hours and frost. I don’t know why I found that so interesting I could do it for 2 hours straight). A friend once thought one of my buttercream cakes was a fondant cake because it was so smooth after obsessive frosting. I think it’s safe to say it is probably better for my sanity to make more fondant cakes in the future 🙂
Daisy Fondant Cake
Ingredients
Dry
- 3 cups all purpose flour
- 2 cups white sugar
- 2 teaspoons baking soda
- pinch of salt
Wet
- 2 cups soy milk
- 1 cup canola oil
- 1/4 cup white vinegar
- 1.5 tablespoons imitation white vanilla extract
Frosting
- 1 cup non-hydrogenated vegetable shortening
- 3 cups powdered sugar
- 1 teaspoon white imitation vanilla etract
- 3 tablespoons soy milk
Instructions
- Preheat oven to 350C. Mix all dry ingredients in a large bowl. Mix all wet ingredients in a medium bowl.
- Combine wet and dry ingredients until just combined. Grease 3 8-inch round cake pans, and line bottoms with parchment paper (cut some out of your parchment roll).
- Pour batter into the pans and bake until an inserted toothpick comes out clean, about 35 minutes.
- Cool cake, and coat with a crumb coat of frosting. Coat a thin layer, a thick layer will make the fondant going over it bumpy.
- Cover cake with fondant and decorate, following the directions outlined in the rest of the blog post.
Notes
Cake recipe was adapted from Chloe Coscarelli's book, Chloe's vegan desserts
 Hello! I'm Sarah and this is Gray. This site is filled with recipes for desserts, savories, and photos of everything delicious we ate when traveling. Enjoy!
{ 7 comments… read them below or add one }
Hello!
I would like to make this cake so muuuuch but I don’t understand the “cups”. Do you know the same recipe in grams ? (I’m french)
Thank you
I’m so amazed how you have time to do all this Sarah. Keeping up with cooking and photographing in med school has def been a struggle haha
I feel your struggle! Finding time to cook and take photos is a lot more challenging during the academic year.
i can imagine how much effort you would have put into this to make it look so beautiful! fondant cakes are definitely not easy to create… props to you!
Thanks Thalia! I’m glad you like it!
It is so so pretty!!! Love it!
Thanks Lily!