
This Vanilla Buttercream cake was made for my Wilton cake decorating class (Course 1, class 2), where we learned how to ice cake and create some simple designs. I decided to make a stacked 2-layer cake that is 6 inches in diameter. The cake is sitting on an 8 inch cake board.
Making the Cake:
The cake itself is made using Sweetapolita‘s classic vanilla cake recipe. To bake the cake I suggest heavily buttering the baking pan and flouring it prior to pouring in batter so the cake comes out of the pan easily. It also helps to cut a piece of parchment paper to fit in the inside of the baking pan and to lay that on top of a floured and buttered surface Also flour and butter the parchment paper so it peels of the cake easy. This sounds like a waste of flour and butter, but it makes the cake slide out of the pan so you can have a cake without dents and tears when you are icing the cake. This will make icing much easier. After you bake, I recommend either freezingthe cake for an hour or leaving it overnight in the fridge to let it cool (icing a cooled cake prevents crumbs from getting in the icing).
Assemblying the Cake:
After removing the two cooled cake layers from the fridge, I first leveled both cakes. Leveling is the process of slicing layers off the cakes until they are both flat. Often when you bake a cake, the center of the cake rises a little and this makes putting one layer on top of the other hard. Leveling slices off the un-flat portions so that you can have a flat surface when you stack the top and bottom layers of the cake. To level, I used a cake leveler, which is a cake decorating tool that looks like a very thin saw. You can purchase it at stores like AC Moore and Michael’s and is pretty important if you want to get flat cake layers. I suppose you can level the cake using a knife, but it is difficult to get as even a cut since a regular knife lacks the measuring ability of a cake leveler.
After leveling, place one layer on the cake board. Then pipe a ring of icing around the corner of the layer to keep the jelly filling in Then fill the inside of the ring with strawberry jelly. The ring keeps the jelly from bleeding out onto the icing you will later put on the rest of the cake.
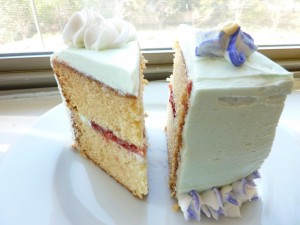
Now put the top layer on the cake, bottom up. You want the top-side of the cake (the side you just leveled) to face the jelly and the bottom of the cake (the part that was touching the base of the cake pan) to face your ceiling. This makes sure that the top of your cake has as flat a surface as possible.
Icing the Cake:
I used Wilton’s decorator icing (pre-made) of medium consistency. The Sweetapolita icing looked delicious, but I simply did not have time to make my own icing before class, so I used the pre-made icing. The pre-made icing tastes okay, but is a bit too sweet and heavy for my liking. I do hope to try some different icing recipes in the near future!
Icing the cake is the best but trickiest part. Here are some tips for icing:
- Let cake chill overnight in the fridge (or one hour in the freezer) so it is not warm while you are icing. A warm cake will melt the icing.
- Put a thin layer of icing on the cake and let it chill in the fridge for a half hour or so till the icing hardens a little. This is the “crumb coat” designed to lock crumbs in so they do not appear on the iced cake. You do not need to make the icing pretty at this point, just need to cover the cake.
- Retrieve the crumb-coated cake and start icing the rest. You can use a cake turn-table to speed up the icing process and help achieve a smoother finish. I put a thick layer of icing on at first and trimmed by turning the cake turntable and using a flat icing spatula.
- Ice very gently. Pressing too hard on the cake will cause crumbs to come up into the icing.
- Keep the spatula parallel to the cake surface at all times. If it is at an angle, this will also cause crumbs to come up.
- Always use more icing than you think you need and then trim it off. Using too little icing will cause crumbs.
One trick you can do for extra-smooth icing finish is to let it cool for 20 minutes at room temperature or in the fridge after you iced it following the steps above, and then to use a white paper towel to gently press around and on top of the cake to smooth out the icing. This creates a nice matte finish. I didn’t do it here because I was decorating in class and did not have time to cool the icing, but it is good to do if you are decorating at home. Make sure to use a white paper towel or the back of a patterned one if you try this, becasue patterns can sometimes come off onto your icing.
Decorating the Cake:
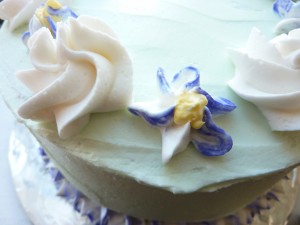
For decorations, I used a large star tip to create the white swirl and the Wilton 2B tip to create the drop flowers. To create flowers with painted edges, I painted purple food color into the inside of an icing bag with a paintbrush before filling the bag with white icing. After pipping a few practice flowers on a piece of paper, the flowers flowed out with purple border on each petal (the first few flowers may not have purple on every single petal). To pipe the bottom ring of flowers, simply pipe flowers close to one another. Pipe at 90 degrees to the cake surface and release pressure right before you pull away the piping bag. This will make sure your petals do not look too long. For the flower centers, mix some yellow food coloring with white icing. To color icing, dip a toothpick into the food color paste, and then swirl it into the white icing. Keep repeating until you get the shade you like.
Happy cake baking and icing!
 Hello! I'm Sarah and this is Gray. This site is filled with recipes for desserts, savories, and photos of everything delicious we ate when traveling. Enjoy!
{ 2 comments… read them below or add one }
Excellent website. A lot of helpful information here.
I’m sending it to a few buddies ans additionally sharing in delicious.
And obviously, thank you for your sweat!
The cake looks delicious and beautiful! The blue flowers remind me blue irises!