Simple Vegan Green Tea Cupcakes
Ingredients
Cake dry ingredients
- 1.5 cups all purpose flour
- 1 cup sugar
- 1 teaspoon baking soda
- ½ teaspoon salt
- 1 cup soy milk
Cake wet ingredients
- ½ cup canola oil
- 2 tablespoons white vinegar
- 1 teaspoon imitation vanilla extract
Green Tea Frosting
- 2/3 cup Earth Balance vegan margarine
- 1/3 cup non-hydrogenated vegetable shortening I used Spectrum
- 3 cups powdered sugar
- ½ tsp white imitation vanilla extract keeps colors light
- 2 tbsp soy milk
- 1¼ teaspoon green tea powder
Royal Icing for flower
- Follow instructions here
Instructions
- Preheat oven to 350 degrees F and line a cupcake pan with cupcake liners.
- Mix dry ingredients together in a large bowl. Mix wet ingredients in a separate small bowl and then pour into the dry ingredients. Stir to incorporate.
- Drop batter into cupcake liners. I use a 1 tablespoon cookie scoop to measure out about 1.5 tablespoons of batter per cupcake. Bake until inserted toothpick comes out clean, about 25 minutes.
- Cream Earth Balance and vegetable shortening together with an electric mixer. Add in all remaining frosting ingredients except the soy milk. Cream together, adding 1 teaspoon soy milk at a time (use how much soy milk you add to control the thickness of the frosting). Feel free to add more or less green tea powder depending on how intense you want the flavor to be.
- Once cupcakes are done, cool completely.
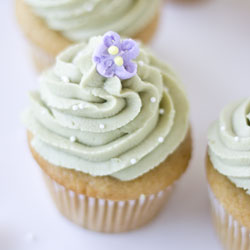
- Pipe frosting with a large star tip (I like the Wilton 1M, Ateco 826 and Ateco 829). Add Sprinkles of your choosing!
(Optional) Making the royal icing flower* (see note for video)
- Follow linked instructions from Wilton on making a simple royal icing.
- Swirl 2-3 drops purple food color gel into about 1/2 cup of your royal icing till it is the desired shade of lavender.
- Fill purple icing in a piping bag fitted with a comma shaped tip (e.g. Wilton tip 102).
- Cut a few small 1inch by 1 inch squares of wax paper, and glue to your flower nail with a glue stick.
- Pipe flower petal with the tip 102. With your dominant hand (right for me), make the shape of a bent "n" where the open ends touch by pressing on the icing bag to release purple icing and rotating the flower pin with your other hand to form the "n" shape of each petal. Make 5 petals, slightly overlapping each other. As you make each petal, rotate the flower nail clockwise so that you do not need to move your right hand as you pipe (or vice versa if you are left-handed).
- Mix 2-3 drops yellow food color gel into about 1/2 cup white royal icing to get the desired shade of yellow (feel free to add more or less color).
- Fit yellow icing to a wilton 3A tip. Make 2 yellow dots in the center for the "pollen"
- Remove the wax paper that has your flower on it from the flower nail, and let it dry overnight. Then store in a container (does not absolutely have to be airtight). These will be good pretty much forever! The flower is more for decoration, so pick it off when you are about to eat the cupcake.
Notes
The royal icing flower piping takes a bit of practice to get right! Don't feel discouraged if it didn't work great the first time - the more you do it, the prettier your flowers will be!
Here is a great video of how to make the apple blossom flower I found on youtube. I highly recommend watching it and re-reading the directions before you try the piping, it'll be much easier!
Royal icing dries very quickly. Make sure to cap the piping bag or the container the icing is in while you are not using it so the dried icing does not clog your piping tip or crust in the container.